Saturday, February 28, 2009

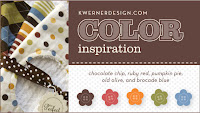
Kristina Werner's Color Inspiration #43


Kristina posted her latest color inspiration two days ago, and as soon as I saw it, an idea came into my head. Unfortunately, the DSP I wanted to use has slightly different colors. I am still planning to make a card based on my original idea, but for submission to her blog, I wanted to use the right colors.

Before I get to my card, I have a confession to make. An order from SU! arrived at my house on Wednesday. I was busy when it was delivered and Michael told me about it later, but even though it was sitting right there on my dining room floor, I didn't open it until THURSDAY AFTERNOON! And then, once I opened it, I took a quick glance over everything, sorted out the orders for two of my customers, and then had to mount four stamp sets for my preorder class that evening (which is why, in addition to preparing for DJ's b'day party-which you'll read about in tomorrow's post, I am only just now getting to Kristina's challenge), so I didn't even get to look at my new 'rubba' until today.

Now, going with my first idea, I wanted to use my Top Notes bigz die, because I haven't given it a fair amount of play time yet. This level 2 hostess set, Echoes of Kindness, was in that box I mentioned, and upon revamping my idea, I decided to use it, and everything else just fell into place.
CS: Brocade Blue, Chocolate Chip & Very Vanilla; Ink: Basic Brown, Old Olive, Brocade Blue, Pumpkin Pie, & Rose Red classic pads; Aquapainters.

Sweet wishes!

Embossing "the box"

The past two days I have posted tutorials on how to make bigger boxes using the Box #2 bigz xl die. A longer box and a taller box. Well, at my open house, some of my customers wondered about using the texturz plates with the box. Since it's an xl die, it is larger than the texturz plates, so I tried a few different ways to successfully emboss it. Here's what finally worked:


First, cut a box. Fold on the "middle" score line-the line that separates one side from the front.


Use the fold/score line as a guide to line up the edge of the Texturz Silicone Rubber mat.


Place the Texturz Impressions Pad on top of the rubber mat, *AND LINE UP THE EDGES!* I did not do that in the picture, and my rubber "squished" out a little and embossed further onto the side panel than I had wanted. If you place the edge of the Impressions Pad directly above the edge of the rubber mat, then even if the rubber "squishes," there will be no Impressions Pad to press it into the plate. If you don't understand what I'm talking about here, don't worry, just LINE UP THE EDGES!


Now the front half of your box is embossed.


Next place your box back on the texturz plate with the non-embossed part in the center.


Again, line the edge of the rubber mat up with the fold/score line.


And again place the Impressions Pad on top of the rubber mat, *AND LINE UP THE EDGES!*


Now your whole box is embossed. The front and side panels might not match up perfectly, but it won't matter.


Assemble your box and decorate as desired. Sorry this isn't the best picture in the world, but of the four I took, it showed the embossing the best. To help your embossed image stand out more, spritz your paper with rubbing alcohol before placing it face down onto your texturz plate.


I used Pacific Point, Robin Hood Red, and Tangerine Tango CS; Tangerine Tango 5/8" striped grosgrain ribbon; Pacific Point corduroy buttons; Birds & Blooms sizzlits; Texture Plates Kit #4; and Box #2 bigz xl die.

Sweet wishes!

Friday, February 27, 2009

Bigger boxes from the Box #2 die-cont.

Yesterday, I shared how to take two Box #2s and make a longer box. Today, I'll show you how to make a taller box. It's much easier, actually. So why did I show you the more difficult one first? I have no idea. But if you figured it out, you'll definitely be able to do this one. ;)

FYI: my new friend, Jen, and I agree that you shouldn't try to make a box that is both wider and taller because the overall infrastructure would be weakened. (How's that for a music major mind trying to go all technical on you?)


Again, you start with two die cut boxes.


Trim the bottom off one and the top off the other. I think I used the score lines as guides.


Add sticky strip to the entire length of the top of your bottom piece (or to the bottom of your top piece, depending on which you want layered on the outside).


Stick the two layers together and fold all the score lines.


Decorate the outside of the box as desired, and assemble. Now I will warn you, where the two boxes overlap, the score lines tended to "fray" a little; they split more than I would have liked. When I added the DSP and made a crisp fold on all the score lines, it tore my DSP a little too. So for my final project, I added a strip of ribbon, which helps hide the seam in general, but covers up the "worn thin" CS/DSP too.


I used the Lots of Tags sizzlits (again) for the label-Kraft. I layered the Wide Oval punch over top-So Saffron, and added some Billboard Alphabet decorative strip letters-Certainly Celery. The DSP is the Delicate Dots from the SAB brochure and the ribbon is Bashful Blue 1/2" striped grosgrain ribbon.

Oh, and this box measures 3 3/4" x 3 1/2" which is the perfect size for a set of love notes & envelopes! I have at least one more tutorial to show with this box, so stay tuned...

Sweet wishes!

Thursday, February 26, 2009

Bigger boxes from the Box #2 die

First of all, let me say, I love my customers. They are wonderful ladies. They love to come stamp with me, and I love to have them. Right now, I am particularly thankful for Jill. She ordered a Big Shot starter kit earlier this month and was the first member of my Big Shot Club, but that's not why I'm lovin' her right now. I was offering a pretty cool SU!per Bowl Sunday special, which she took advantage of, and got some free dies in addition to the ones that come in the starter kit. I jokingly said that I might play with them before I delivered them to her, and she enthusiastically said I could!

So, play with them, I have. I cut at least 14 different colors of CS to make tons of labels/tags with the Lots of Tags sizzlits. And then there was also the Box #2 bigz xl die....now, my own Big Shot starter kit arrived about a week before Jill's, and I still have yet to touch some of my dies, but that Box #2 has been very loved over the past week.

I first tried to cut the box out of a 4 1/4 x 11" piece of CS, so as to get two out of one 8 1/2 x 11 sheet of CS, but unless you don't want the box to close, that doesn't work. Though I'm sure I will come up with some type of closure--like a round tab punch attached with some velcro (that JUST came to me).

Anyway, I needed a box to put some little goodies in for my friend Julie (she's in my downline), one of which was a SU! logo pen. The Box #2 wasn't long enough, so I thought, "I'll cut out two of them and attach them together to make a longer one." And that's what I did. Now the first time I tried it worked, sort of, but I didn't think it all the way through before I started taking pictures for a tutorial. So I tried again, and thought I had an easy way to make the tutorial, but that attempt totally failed, and then I couldn't figure out how I had actually made the first one, so I had to look back at the pictures I took.

Well, I finally figured it out, and I hope by the picture tutorial below, you can too.


I started by cutting two boxes. I cut the first like this. Basically I trimmed the little tab off one end and the last pannel off the other. I used the score lines as guides.


Here is how I cut the second box. Unfortunately, I cannot give you exact measurements. I cut the right hand side just inside the edge if the bottom flap. I roughly measured the length of the top from the outter edge to the cut and then cut the left hand side the same length only from the first score line instead of the outter edge. Does that make sense?


Then I cut away the extra little tabs from the bottom of the two pieces.


Here are the three pieces you need to go on to the next step and complete your box.


Next I attached the pieces with Sticky Strip.

The first box I made, which can be seen in my Splitcoast gallery by clicking here, was 5 1/2-ish" long. So the pieces all overlapped a little more than in the picture to the left and I had to use more sticky strip, but for this tutorial, I didn't want to use more sticky strip, so I attached the pieces to make about a 6" box.


Be sure to decorate the outside of your box BEFORE you put it together. Then add sticky strip to the little tab on the end and attach it to the inside of the flap on the opposite side.


Finish your box with ribbon, a tag, a label, or whatever strikes your fancy.

Hey, check back over the next few days for more fun stuff with this Box #2 die. You won't want to miss it!

Sweet wishes!

Wednesday, February 25, 2009

Think Pink~Ink Pink

Back in August I started a monthly feature on my blog. It lasted two short months (here was September's), and then took a 4 month hiatus, but today it returns! I thought of an official name for it too: Think Pink~Ink Pink. On the 25th of each month I will have a pink-themed card. You can win the card, blank inside, along with a coordinating envelope by doing two simple things.

1. Do your monthly BSE (breast self-exam).

2. Post a comment on the relevant Think Pink~Ink Pink blog entry by the deadline.

After the deadline for posting a comment has passed, I will randomly choose a winner.

Now, I know some of my customers have tried unsuccessfully in the past to post a comment, so I created a video tutorial. You can find the tutorial in the blog entry below this one (or by clicking here). It is my first of such tutorials, and I know there is a lot of growing room there, so bear with me.

So, you wanna see the card you can win? Here it is:

I CASEd this gorgeous card by Kathy LeDonne. Obviously I changed the colors, and no, that little crystal on the label is not a Stampin' Up! product, but I had stamped the sentiment a little off-centered and it needed something. I tried a half pearl from the Pretties Kit, but even the smallest one was too big. :(

I used the hostess level 3 set Dream a Little, Pink Pirouette, Pretty in Pink, Gable Green & Versamark inks, Pink Pirouette & Whisper White CS, the Coated White Pen Stripe pattern from the new Taste of Textiles specialty papers (found on p.156 of the current IB&C), Backgrounds I texturz plates, Lots of Tags sizzlits, paper snips, dimensionals, and White EP.

So, now to win this card, check your chest and leave a comment at the bottom of this blog entry by Saturday, February 28, at 9:00pm. Remember to view the video tutorial in the entry below if you need to. And don't forget to visit thebreastcancersite daily and click to fund free mamograms.

Sweet wishes!

ps. Thanks, Jill, for letting me borrow your sizzlits! I've been having such fun. I'll give them back tomorrow, I promise. Your Box #2 die...now that's another story. ;)

How to post a comment

Hey everybody! I just made a video tutorial on how to post a comment on a blog. I did it under the assumption that you do not have a Google blogger account, and therefore, you would be posting anonymously. (Because if you do have a Google blogger account, you should know how to post a comment!) Anyway, I hope that some of you find it helpful. Be sure to read the paragraph below the video too, for some additional information.


A few things I forgot to mention in the video: First, make sure to sign your name at the bottom of your comment especially if you are posting anonymously so that the person whose blog it is will know who left the comment. And second, my comments are in a pop-up box, just like Beth's, but on some blogs when you go to leave a comment, you will be taken to another screen, and with other types of blogs the comments might appear below the specific entry. Also with non-Google blogs the format may be different, but since I'm a Google user, and I made this video so that my friends and family can leave comments on my blog, I only showed this way. :D Finally, I *think* it is possible to leave a "non-anonymous" comment if you have any kind of Google account-like a google email address or if you have used google checkout before, so try entering your username and password in those blanks I pointed out and see if it works...it might not, but it's worth a try.

Sweet wishes!

Monday, February 23, 2009

The Big Shot--it's a BIG deal!

Yesterday I had an open house featuring the Big Shot for Stampin' Up! die-cutting machine. I had a blast preparing the projects, demonstrating various types of dies and techniques, and helping my customers create their two make-n-take projects.

Now I am the first to admit that I am the "queen of CASEing"! The VAST majority of projects that I use at my classes and workshops are lovingly copied from some other creative stamper's ingenious idea. However, the above beauty (and I am quite fond of how it turned out), is all mine. There may be others out there similar or even the same, but I did not copy them. This came out of my very own brain. Except for the thin Kiwi Kiss layer behind the Baja Breeze panel. That was Beth's idea. I had the rest of the card completed, and I took a picture of it and emailed her with the subject line: HELP! She said what I already knew...it needed more Kiwi...but I was trying to add ribbon somewhere, and when she suggested that I add another layer, I knew she had hit a home run. So thanks, Beth!!!

We used the Birds & Blooms sizzlits and Swirly decorative strip dies and the Backgrounds I texturz plates.

This project, however, was CASEd. There was recently a demonstrator only challenge over on Splitcoast to make these adorable treat holders. The original idea came from a customer of Barb Mullikin. She has a great tutorial on her blog, so I won't reinvent the wheel. Here's the link to the Petal Card Hanging Heart Pouch tutorial. In addition to using her tutorial and the demo challenge for inspiration, I totally fell in love with this gorgeous rendition by stampalooza. I didn't want to change a thing, but I did want to use the Delicate Dots DSP from the Sale-A-Bration brochure because the first 10 people to join my Big Shot club are receiving a pack of that paper and the SAB ribbon bundle. I also used the texturz plates to dry emboss the petal cards once they were cut out (I haven't figured out how to "dry emboss" with my Crop-A-Dial yet). And the absence of the flower on the front is due to the fact that I'm still trying to figure that out too. I know it's not difficult and there are semi instructions in the SAB brochure, but it I had had a very busy week and weekend, and I just didn't have time to conquer that part of the project.

Here we used the Petal Card bigz die (the same one I used for my kiddos' classes' valentines!) and the Backgrounds I texturz plates again.

I also demonstrated a bigz xl die and an embosslit die, so everyone got a good sampling of all that the Big Shot can do. The one thing I didn't show is the various materials that it can cut, but we'll explore that side of this baby during my club classes. If you are interested in finding out more about my Big Shot club, see the bottom of this post.

Sweet wishes!

Wednesday, February 18, 2009

Hey look! I stamped for FUN!

I was over at my friend and downline, Beth's, blog looking for a card I wanted to CASE. Well, she found the tutorial over on Kristina Werner's blog, and after I watched the video tutorial, which was from last April, I had to check out Kristina's latest updates. Wouldn't you know, there at the top was this:

Another of her wonderful color challenges. I haven't participated in a challenge, or even stamped just for the heck of it in a long while. So, as is the point of a challenge, I was inspired. I spent the morning preparing for my Big Shot open house, which is this Sunday, and since all my Big Shot toys were out, I decided to play around some more.

I had seen but never tried the "Negative Effect" technique, which originated using Cuttlebug embossing folders. However, I thought, "If it works for a CB folder, it should work for my Big Shot texturz plates." And guess what, it did!

To do this technique, lightly ink up the texturz plate. This works best using a brayer, but you can use a sponge, sponge dauber, or the ink pad directly on the plate, just be sure that little or no ink gets into the recessed areas. Then compile your "sandwich" as usual. Now, I didn't want to get ink onto the silicone rubber pad that goes after the cardstock in the sandwich, so I placed a tissue between the paper and the rubber. I did add a cardstock "shim" (an extra layer to increase the thickness of the sandwich) between the rubber and the impressions pad. I have been warned that if you ever need to add a shim, to be sure to do it somewhere in the sandwich and not to the very top or bottom because the paper can actually roll up into the machine and get all kinds of stuck.

To finish the card I used the Bigz Beautiful Butterflies die, the Hostess Level 2 A Little Somethin' stamp set, and some Kiwi Kiss satin ribbon.

Sweet wishes!

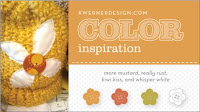
eta: Rhonda asked, I'll answer. The colors I used are those from the challenge swatch at the top of this post: More Mustard, Really Rust, Kiwi Kiss, and Whisper White. To do the "negative embossing" technique, I brayered Really Rust ink onto the texturz plate and then ran some More Mustard CS through, pre-cut to the size I needed. Then I layered that panel onto W. White and layered that onto R. Rust, and finally attached it to my Kiwi Kiss 5x5 card. I hope that helps. I don't think brayering a lighter color would show up. The lighter color (in this case the M. Mustard) is the color of the CS and the part that is raised from the embossing process. The darker color (R. Rust) that was inked on is the "flat" part. Clear as mud?

Here's what else I did last week:

In addition to cutting all the paper for my Designer Series Paper swap, (well, I JUST finished that) I *got* to make valentines for AJ’s ballet class (8), AJ’s preschool class (8), and DJ’s kindergarten class (17). I used the petal card Bigz die and my new Big Shot for Stampin’ Up! to do them all.

Before I show you the pictures of the cards, I wanted to let you all know that I'm having an open house to introduce the Big Shot this Sunday, February 22, from 3:00-4:30. It is a free event, and we will be creating two make-n-take projects. I am starting a Big Shot club (I'll post all the info at the bottom of this entry), and there will be mega benefits if you join during the open house. Please let me know if you plan to attend the open house, so that I can prepare enough supplies for everyone. You can call or email me or post a comment here on my blog.

Now to the valentines.

I used a retired ballet set that had never seen ink until now. It wasn't even mounted. I'm not sure how well you can see it, but under the "Happy Valentine's Day" sentiment I stamped the hanging pointe shoes from the set in Pink Pirouette (an appropriate color to stamp ballet shoes). I "signed" AJ's name after the little heart at the bottom (which came from Goody-Goody Gumdrops, a Level 3 hostess set).
For her preschool class I made little 2 5/8" square cards and tucked them into "envelopes" I made using the petal card die. The envelopes didn't stay closed very well, but I had a zip-lock baggie full of goodies for each child, so I just tucked them into the bags. I added each child's name to the front of the envelope similarly to how I did on the bottom of the heart pocket for the dance class ones. I think I added a pink or red layer and more than one punched heart. I also attached a punched heart to the flap of the envelope. This is another retired set called Sweet Pea. The four image combinations say "sweet" with a pea pod, a bee with "mine", "cutie" with a pie, and "you're a" with a star. I stamped the star in silver.

I also made cupcakes for her class.

I wanted to do a totally different card for DJ's class, and use the petal card die to make an actual petal card, but then I found the two bags of lollipops I had bought and realized that I had to do more of the pockets. The white part pulls out like the ones for the ballet class did, but I didn't add the extra layer. Those lollipops were almost the end of me, though. They would NOT stay in the darn pockets.

When all was said and done, I had cut out at least 82 petal cards from the petal card die, and it took me almost no time. I say "at least" because I may have miss-cut one or two and had to do extras. In addition to all the ones I needed, a friend asked me to do 24 for her son's class. But you know what? I'm not even sick of the petal card die! I'm using it for a project at my open house on Sunday. Which reminds me that I was going to post all the info, so here it is...

You’re invited
to join my new
Big Shot Club

Stampin’ Up! has teamed with Sizzix to offer a multipurpose die-cutting system called The Big Shot for Stampin’ Up! You can use the Big Shot machine along with a variety of different style dies to create die-cut shapes, envelopes, tags and much more with ease! And the Big Shot also works with a wide selection of materials including card stock, Designer Series Paper, fabric, chipboard, plastic, thin metal, leather, and so on. Basically, you can do a lot of really cool stuff all on one nifty machine—it’s a big deal!

So now that I’ve explained what the Big Shot die-cutting machine is, I’ll tell you a little about my Big Shot Club. Club meetings will be held once a month, and we will create three different projects using the featured die (or set of dies) of the month. I will be hosting an open house, which is a free event where you can come and find out more about the Big Shot machine, on Sunday, February 22, from 3:00-4:30pm in my home. I had to do a Sunday this month because all my Saturdays are full. Those interested in joining the club will set the dates and times of future classes during this initial meeting.

The membership fee is $20.00, and the class fees will be $5.00 each. The membership fee along with the first four class fees will be waived if you decide to purchase the Big Shot Starter Kit. Each class fee will be waived if you purchase the featured die of the month.

I will readily admit that the starter kit is expensive, $195.95. However, you will have everything you need to start using your Big Shot machine right away, including two Bigz dies, a decorative strip die, and a sizzlit 4-pack of dies, all featuring exclusive Stampin’ Up! artwork. Plus, if you order your Big Shot Starter Kit by February 22, you will receive a roll of sticky strip perfect for adhering your 3D projects, a level one hostess set, $20 in catalog merchandise, four items from the Sale-A-Bration brochure, and a copy of the Spring~Summer 2009 Idea Book & Catalog all for FREE! That increases the total kit value to over $326.00. AND, the first eight club members will receive a free gift with a retail value of over $29.00, whether you purchase the starter kit or not.

You'll love what the Big Shot machine, a 6-time winner of Creating Keepsakes Reader's Choice Award for best die cutting equipment and dies, can do for you. And I can’t wait to start showing you how! Please call or email me (or post a reply to this blog entry) if you are interested in joining the club, or to RSVP to attend the open house on Sunday, February 22, from 3:00-4:30pm.

Sweet wishes!
Tuesday, February 10, 2009

I had every intention of blogging yesterday...

...but here's why I didn't get around to it.
I was getting ready to cut all this glorious DSP for a paper swap for my customers.
Here are all 37 packs once they have been opened. I'm still waiting on two packs of the Manchester, because it was on back order. (But they have shipped and are scheduled to be delivered tomorrow, so once I get back from our trip to Atlanta this weekend, I'll have the swaps ready to be delivered.)
The details of the swap are: I am cutting the paper into 6x6 "shares", and everyone will receive a piece of each design in each pack. So, there is six pieces of each of 20 different DSPs for a total of 120 squares of paper! Some people purchased two shares, so they will receive 6x12 pieces. My customers and I chose not to include the Patterns DSP in this swap, but it does include the new Specialty papers that are glossy or textured heavy weight papers. Several of my customers already have the Candy Lane paper from the Valentine's Bundle class I just had, so they will be receiving 114 pieces (6 each of 19, and a lower price).

If you missed out on this swap, and are interested in participating, let me know. If I get at least four people or four shares, I will host a new swap. The cost is $35.00 for one share (6x6 square), $65.00 for two shares or a half sheet (6x12), or $125.00 if you'd like one whole sheet (4 shares) of each design. That's a terrific deal! Yes, the cost goes down the more shares you purchase, but that's less cutting for me, and therefore a smaller "handling" fee.

Also, if you are interested in participating in a Patterns DSP swap, let me know. A share of the Patterns paper swap will be $23.00. That is a flat fee for each share. Again if I get at least four shares worth of orders I will host this swap.

You can call me, email me, or leave a comment on this post to let me know you are interested. Those of you who live out of town can add $2.00 per share to have your order shipped to you once I prepare it.

Sweet wishes!

Sunday, February 8, 2009

Lovin' my Love You Much bundle

As promised in yesterday's post, here are the projects we made at my Bundle up for Valentine's Day class the other night. The Love You Much stamp set, Heart to Heart punch, and Candy Lane DSP, made up the bundle, and though you can no longer order them as a bundle, you can still order each item separately.

We made four different projects at the class. We were not able to finish the last one, but I have finished mine here, so those of you who were at the class can get an idea of how you can finish yours too. All of the ideas were taken from projects submitted to Stampin' Up! by various demonstrators.

This first card was my favorite. It was CASEd from Valerie Durham. She added a sentiment to the bottom right corner, but I thought it looked okay without it, and made it a little quicker (which ended up being important that night). But the love birds are just the cutest. I actually named the file of this picture, "Why do birds sing so gay?" which is the opening line of the song Why do Fools Fall in Love? I sang that song in 8th grade as a "singing Valentine" that our women's ensemble did as a chorus fundraiser. It still pops into my head all the time.


The idea for this card came from Renee Van Stralen. I wanted to use this "lovey-dovey" heart/Valentine's stamp set in a non "lovey-dovey" heart/Valentine's kind of way. The kindness saying helped turn this heart into a thankful one. Renee's original card had a Chocolate Chip base, but since our other card was Close to Cocoa, I didn't want two brown cards.

This too stinkin' cute project is another one from Shauna Mikuliak. (See yesterday's post for the cute popcorn cover I CASEd from her.) We used the new eyelet border punch for the top edge and packing tape with Dazzling Diamonds glitter in the Heart to Heart punched window. It is super sparkly IRL. To make the tag, we used the now discontinued 1/8" handheld punch, but you could use your Crop-A-Dial just as easily. My only complaint is that M&Ms don't come in coordinating SU! colors. ;)

Here is the final project. The one we didn't get to complete. We made the heart, added the ribbon and covered the outside with DSP, but we didn't get any decorations made for it. So here is an idea for how to finish it off. I borrowed this idea from Kelly Gettelfinger. My ribbon actually threads through under the scallop focal point. I would not recommend this, though. It's a pain to try and tie back shut. So do as I say, not as I do, and move your scallop a little lower or something.
And here's the inside of the card. Isn't that cool how it pops out like that. There is a little room to write a message on the pink parts, and then room to put a picture on the bottom brown space. And it will fit in our medium size envelopes.

This stamp set is so much fun, and I really appreciate all the fantastic demonstrators who submitted ideas using it to Stampin' Up! I'm not sure what I would have done without these great ideas to CASE!

Sweet wishes!

Saturday, February 7, 2009

More Open House stuff

Did you know that as a Stampin' Up! demonstrator, I have access to a "demonstrator only" side of Stampin' Up!'s website? Well, did you also know that there are tons of resources available to us demonstrators, including lots of CASEable ideas? SU! has recently started asking for demonstrator ideas for classes on various themes. One was Valentine's day, and several submissions used the Love You Much bundle. Shauna Mikuliak shared some adorable ideas, and I used her Popcorn Package idea for the gifts I gave those who attended my open house (and I've given some of my surplus to customers who have placed an order recently).

Shauna's were much cuter because she actually used our mini envelopes and had the heart on a card that tucked into the envelope. That idea didn't work out for me for a couple of reasons. First I cut my DSP too small, and then when I went to get my envelopes out of the drawer, I only had 4 mini envelopes, and I knew I needed to make more than 4 gifts. Bummer, but I'm still okay with how my simplified version came out, and my customers loved the idea. As my friend, Jill, said, "Everybody likes popcorn, and everbody can eat it. Whether you're on a diet or not!" Very nicely put, Jill.

Now stay tuned because I had a whole class featuring the Love You Much bundle the other day, and I'll be posting the four projects we made tomorrow.

Sweet wishes!

Friday, February 6, 2009

My open house MNT

Back on Saturday, January 24, I had an open house for the Spring~Summer 2009 Idea Book & Catalog. I already admitted to the ladies who attended that it did not turn out quite the way I had envisioned. After they all left, I remembered about ten different things I had wanted to show them or meant to tell them about. However, one thing that went right was the make-n-take. I CASEd this gorgeous card by Karen Barber. I love absolutely everything Karen does. I was visiting her blog the other day, and she was complaining about what a bad blogger she is, but her creativity and artistry certainly make up for any infrequent blogging, plus she's got some darn cute grandkids. But what I also love is that she talks/types as "wordily" as I do! It's great!

Sweet wishes!

Another AJ post

My little lady is three-years-old now. Here are some highlights of the days (yes, that's supposed to be plural) we spent celebrating. We took cupcakes to school. She didn't wear the hat for long, but Ms. Amy and I were able to convince her to put it on long enough for me to get a picture.
We had a lot of fun at her birthday party. A few friends from church joined us for a princess carnival. Here are the girls.
And the boys. They were all dressed up when they arrived, but "Fritter" took his doggy costume off before the party even started.
We played all kinds of carnival games. Here's AJ trying to catch butterflies in the net. We also had a cake walk of sorts, a version of basketball, an interesting interpretation of Hot Potato, and in addition to all the carnival prizes, everyone got a temporary tattoo. AJ's was a ballerina sea horse, but we didn't get a picture of it.
And what princess carnival party is complete without a princess cake? However, I'll admit my horrible mom-ness and confess that we didn't have any candles for her to blow out, so the next morning (her actual birthday) we put candles on her pancakes. When she "spit" them out, we realized it was quite alright that we had forgotten them the night before. :)
Sweet wishes!

Wednesday, February 4, 2009

Catching up...again

Well, I think my computer is finally starting to cooperate. My email account is still temperamental at best, but for the most part it has been sending out my recent communications. And although it doesn’t work quite the way I’d like it to, I’ve found a relatively painless way to download my pictures. I end up with more work on the back end, sorting and renaming them after they’ve been imported, but at least I get them off the camera. However, with all that said, I can’t promise I’ll be back to regular blogging in the near future, but you never know. And hey, it’s a start.

Back on January 20, I had a workshop for a great group of ladies. This was my fourth workshop with them, and we always have so much fun. They get together to scrapbook or make cards on the first and third Tuesday each month, and they've allowed me to just slip right in every once in a while and do a workshop for them during their regular meeting time. At my first three workshops I put a lot of effort into showing the ladies how they could use stamping in both their card making and their scrapbooking. This time, however, I focused only on cards. In fact, one card done three different ways. Look at the different samples below to see how changing colors, stamp sets, and accessories can totally change the look of the same exact card!

The basic card is a vertically oriented 4 1/4" x 5 1/2" size card with a 4"x4" panel at the top.
The first card we made using the Love You Much bundle, which was a special during January. The bundle is no longer available, but the individual parts still are: the Love You Much stamp set, Heart to Heart punch and Candy Lane DSP. In fact, I have a class featuring the bundle tomorrow night. I'll try to post pics in a timely maner. Anyway, I CASEd this card by bbbp, which she CASEd from sears1130.

Oops, I posted these in the wrong order. Oh well, this was the last card we made, and I took this idea from justcrazy's card here and Super Gram's card here. I know it doesn't really look like either card, but again, I wanted to use the same layout for all three cards we made that evening, so I took the colors and masking idea from justcrazy and sort of rotated Super Gram's layout. After getting the idea close to perfect in my head, I realized that it is difficult to write on the inside of a black card. I know that you can use a gel pen, and Stampin' Up!'s is the best on the market, but I wasn't sure if all my workshop guests would have gel pens at their disposal, so I cut some extra Whisper White CS, and here's how we decorated it.

So this card was the first one we started because we needed to give the chipboard a chance to dry after pressing it into the Cameo Coral Craft pad. Now this particular chipboard flower is no longer available, but I happened to have nine of them on hand, and I also happened to have eight guests at the workshop, plus myself, so it worked out perfectly (our current chipboard flowers are cuter, if you ask me). The basic idea for this card was taken from this beautiful work of art by kaloso05. Again, mine is quite different, but I knew I wanted to use the Dream a Little stamp set (Level 3 hostess set) and I knew I had these chipboard flowers laying around, so when I came across her card in the SCS gallery, I knew I had to CASE it.
Sweet wishes!
Btw, I always encourage my customers to stamp their envelopes to coordinate with their cards, and all the cards pictured above do have coordinating envelopes, but I only took a picture of the first one.